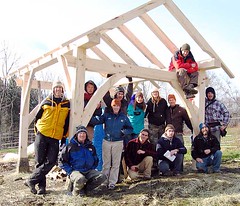
my class's timber frame went up successfully today in about three hours! so, here is a brief recap of how we did it start to finish. this might give you an idea of the process that we'd go through at destiny to timber frame some of our buildings. the picture to the right is the site at knoll farm near waitsfield, vermont, a non-profit organization devoted to bringing people together to communicate. yestermorrow, the design/build school that i took the timber framing course at, agreed to build them a cover for their earthen stove. our class of eleven visited the site on monday first thing. the views from the site are stunning (i'll post more about knoll farm later) and inspiring.
we picked up rough-sawn timbers at knoll farm. they were white pine that had blown down just a couple weeks before in a wind storm that caused damage throughout the valley. so, the frame is built from timber that grew just a few hundred yards from where it will sit. the picture shows us loading the timbers onto josh jackson's trailer.
josh and skip, our skilled and experienced instructors gave a run down of the shop and introduced us to our project and some of the first skills we'd be learning: square rule measuring, tool sharpening, hand sawing and chiseling. this course could have been called square rule timber framing because square rule was at the core of everything we did. i may go into it in more detail later, but in essence it allows timber frames to be cut without testing before assembly which saves a lot of time and effort. we broke into teams, each taking a timber to work on. four teams took a post and two teams cross beams. kelly—my partner for the week—and i got the south-west post. here's kelly trims the top of the post.
at the top of each post is a tenon, the male component of a joint. creating one requires removing wood all around it first by sawing and then chiseling. we learned that for joinery to work it needs to be tight. our work was expected to be accurate to within 1/16 of an inch. josh told us we had to split our pencil lines when sawing or paring with chisels. this seemed like a far fetched possibility to me but to my surprise it's not that difficult with with properly sharpened and chosen tools. our first cuts mostly didn't meet tolerances but by the end of the week i think all of us had a better feel for what it takes to cut with precision—mostly being relaxed and going slow. in this course we only used hand tools except for a few occasions when we ran out of time. the lack of tool noise and the presence of music, laughter and banter in the shop made time fly and working wood by hand brought me all kinds of new appreciation for wood.
at times work was very relaxing. for much of it one team member simply held the beam in place and did whatever they pleased while the other cut and pared.
a great deal of our time was spent laying out cuts. it requires lots of concentration and opportunities for mistakes are great. we double and tripled checked measurements. as skip told us, "you can't put it back once you've taken it away." lumber isn't perfectly square, shaped or straight, so at each step one has to keep in mind exactly where on the timber measurements originate and how they relate to each other. it's safe to say that square rule is all about measuring accurately, consistently and clearly. it's critical not to leave work lines on the timbers that might confuse when the sawing or chiseling. we spent lots of time erasing our lines, cleaning up before cutting. our layouts had to be inspected by the instructors prior to cutting, which is, no doubt, why the frame went together flawlessly in the end. pictured here are a couple of tenons finished.
the hole that receives a tenon is called a mortise. here gabriel uses a boring machine to drill a row of holes to a specific depth which removes most of the wood of the mortise accurately and quickly.
once cleared with the boring machine the wood left has to be pared to the layout. our mortises and tenons were 1-1/2" thick. by this time most of us were getting comfortable with the chisel.
this is our finished post with all its mortises and tenons cut and peg holes drilled. mortise and tenon joinery is held in place by hand-cut hardwood pegs that spring the joint together. the peg holes are drilled 1/8" offset from each other so that when the peg is driven in it not only secures the joint but spring loads it so that when the timbers dry and shrink they will remain tight. for this project we "housed" the joints. you can see the mortise near the end of this post has an inset cut around it. this hides small mistakes in the joint and provides a greater bearing surface for the beam that's joined.
after we finished our posts, cross beams and braces, we learned how to cut the plate that sits on top of the posts and hosts the frame's rafters. each of us cut a seat. here's josh, our instructor's cut, which was pretty near perfect. i didn't do so well!
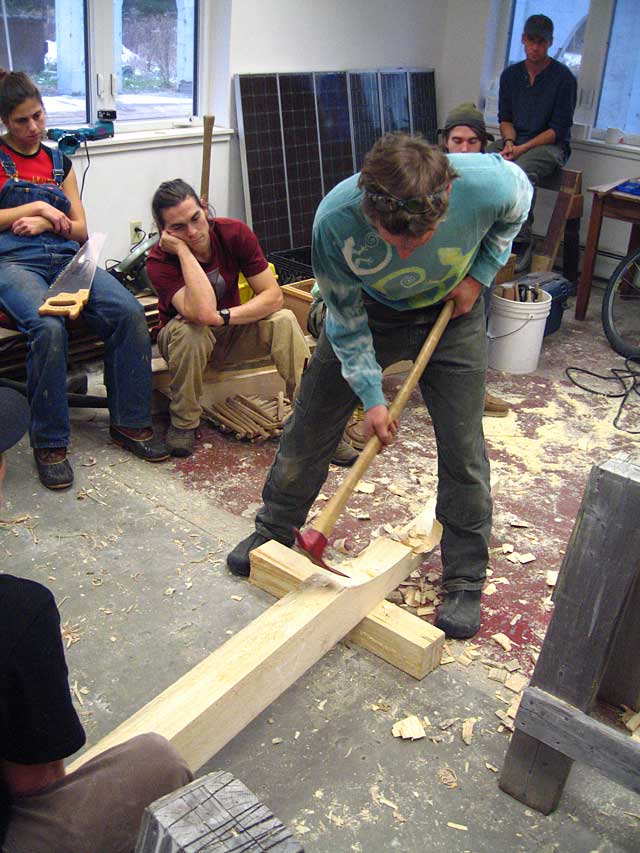
each of us also cut a rafter. each rafter had a reduction and tail so that the rafter would intersect the outside edge of the plate and extend beyond the posts two feet. we cut the reductions with an axe, an adze and a spoke shave. the axe is used to remove lots of material fast. the adze smooths the marks left by the axe and the spoke shave cleans up any small problems. josh showed us how to adze, which was probably the most dangerous thing we did because the blade moves toward one's legs when doing this. the rest of our work was very safe and no one, to my knowledge, cut themselves the whole week.
so, in five days, as complete novices, we cut the frame almost entirely by hand. we hand planed and chamfered all the timbers and joints on friday which gave them a nice glow and a finished look. then some of us stayed out til the wee hours singing, laughing and telling stories around a bonfire fueled by all the wood chips we'd removed.
here's the trailer loaded with all our work ready to go to the site for assmebly. seeing this brought to mind how cool it is that we created this frame without ever assembling it—we built it from an idealized plan with no on-site measurements. i've never built anything this way before. in fact, because i've only done renovations before, the idea of creating a building in a shop, piece by piece, to be assembled on site, was novel and delightful.
our pavilion has two "bents", or sections, each of which forms the ends of the frame. we assembled these first and placed them upon concrete piers poured by the farm earlier. seeing them come together and fit nearly perfectly was magical. we'd been working in the abstract all week and here was the proof that all our careful measuring was well worth the time. josh told us a story about a lumber handler who said to him, "i hop you don't mind me working slowly. i find it saves time."
the bents are assembled flat on sawhorses, pegged and then lifted vertical by hand. once upright we hoisted above and then down onto threaded rods extending from the piers. adhesive in a hole drilled in the base of each post, when cured, will keep the posts from lifting.
we placed the plates on top of the posts next. once both plates were pegged we installed the rafters.
in just three hours, we loaded, delivered and erected the frame. the raising went without a hitch. here is a corner fully assembled and the entire frame sitting on the hillside. we shared a yummy batch of hot chocolate made from raw milk. the steward of the property attached a tree branch to the peak, a traditional practice that you'll see even on steel frames. the next steps are for the farm to put on a cedar shake roof.