Thursday, April 21, 2005

Volunteers

I've been telling people about a straw bale project on some beautiful land in southern Vermont. To my surprise, a lot of people want to help out, learn how to do straw bale, want to check out the land. One of the potential benefits of doing an alternatively built project is that it's interesting and draws attention. I can imagine work weekends that are more or less educational workshops on alternative building. By being somewhat radical in our construction we may help get the project built.

Slightly Bigger

Here's where I am as of tonight: a slighter larger version of the "mini-kitchen" posted before. This provides a small space for eating or gathering completely inside plus all the kitchen and bath facilities. A screen porch on the south side provides a place to hang out when it's warm. I think this plan could fit into the budget but I won't be sure until I do some budget calculations after the annual meeting. I'd like to do a few more iterations of this design, thinking about lighting and perhaps some more whimsical architectural features, something more expressive than a rectangle. But, I like this design the way it is too. It's simple and delight can be worked into it as we build it.


Too Big?


Last night I called up the local building supply company to see what lumber costs might be for the roof framing of the building pictured here. A very rough guess brought me to about $10,000. This started me thinking that this plan is too ambitious. Yes, we all would like a nice living room, lots of storage and a comfy kitchen, but I'm starting to think it's too big for our budget.


So, I cut down the plan too see how big our minimum requirements might be. They're pictured here in a plan that provides only a kitchen, bath and shower, plus a little storage space. This building would quite a bit less than the above, the roof framing being about $3000. But, I question whether this smaller kitchen would serve the camp needs, especially if we're considering renting the place out to others. It provides no place to go when it's cold.

Wednesday, April 20, 2005

Hipster


Getting down to the wire! Annual meeting is in two days.

I'm focusing on the roof pictured here, a "dutch hip" or "hip-gable". I like the way it shelters the entire building, inside and outside porches under a single shape, give opportunity for ventilation in the little gables, possible place for loft sleeping above the porch, and it looks interesting from the meadow, being a little more complicated than a simple gable butt in an elegant way.

Today I will be building a presentation model. Jay Schuster has agreed to bring a data projector to the meeting so I can walk everyone through the design in real time.

Saturday, April 16, 2005

Land Visit


Gabriel and I visited the land today and met up with several other faeries up for the work weekend, Peat, Bambi and Jim pictured. I was able to take some panoramic images and verify that the land more or less conforms to the computer generated model. Several of us took a walk up to the site and discussed the clearing plan, the privy location, septic system location, orientation of the bath house and the kitchen building, access to the buildings and the distances between the buildings. We happened to arrive just about noon so due south was obvious (the sun is always due south at noon) and that helped with visualizing the building orientations. The site feels a lot smaller to me than it does in the computer simulation.

This week I will be spending nearly all my time working on the design getting it to a presentable state for the annual meeting in Burlington next weekend.

Sunday, April 10, 2005

Away

I'm away until April 16th doing yoga training.

Saturday, April 09, 2005

Huts

Here are some pictures of Appalachian Trail huts that my design assistant, Gordon James Boddington IV, dug up for me yesterday. Since almost all of them are in deeply remote locations they are made of mostly things that can be carried to difficult locations. They are also built for severe weather. I like the wood interiors and the simplicity of them. I noticed they use compact fluorescent lighting in industrial fixtures. Perhaps we can do something like that for our lighting. Solar panels are nicely integrated with the roofs.


Foundations

Underneath both the bathhouse and the kitchen we'll need some kind of foundation. I've investigated a few different kinds and here's what I've found.

Pier

This is a common rural type of foundation made up of concrete piers set on footings about six feet below grade. Little earth work is required, little concrete and it can even be done by hand if there's enough labor available. The underside of the building floats above grade creating a space under the building. This has the disadvantage that air moves under the building making floors cold. Animals and other critters can make that space home. If building with straw bale this technique can be expensive because straw bale weighs alot and the beams you have to use to support it might cost more than the difference in the cost of a slab foundation.

Basement

This is the most common type of foundation in New England because it provides excellent frost protection and a place to put all your junk. Deep footing walls create a protected air space under the building that stays about ground temperature if not heated or cooled. The space provides a place for mechanicals and easy underfloor access. This kind of foundation uses a lot of concrete and is usually installed by a professional with formwork and is often one of the more expensive parts of a building.

Frost Protected Shallow Foundation

This type of slab foundation, pictured right, was championed by Frank Lloyd Wright and has been approved for use all over the United States and Canada. It's been proven to perform as well as a basement foundation in frost protection but uses a fraction of the concrete and labor. It does usually require the use of foam insulation which I'm not sure is nasty to fabricate, but seems like it probably is. A large skirt of this insulation spreads out from the building, more in the corners, to keep frost from getting under the building and heaving it. Temperature records of FPSFs show that even in the harshest of climates the temperature under the slab remains above freezing. A disadvantage of a large mass foundation like this is that it takes a long time to change its temperature, which could be an issue for Destiny since in October, for instance, the slab would not warm up much at all during the course of the gathering. Passive solar design might be able to help with this and keep the slab warmed enough even in winter months.

Straw Bale

One of the more radical foundations I uncovered is the straw bale foundation. A two inch layer of concrete is poured over a stone bed, straw bales are laid with spaces between them, then another layer of concrete is poured over the bails, filling the spaces between which support the floor above. The straw provides insulation and the small concrete infil columns provide structural support. A firm in Quebec, ArchiBio, pioneered these and several are in good condition today, although in some the straw has rotted, which doesn't structurally affect the slab which is entirely supported by the concrete between the bails. This kind of foundation seems a little iffy to me, but I'm going to look into it more.

Concrete

Most people think of concrete as a benign building material, including myself. I was surprised to find out in Serious Straw Bale that concrete is one of the most energy intensive materials used in construction. Each cubic yard of concrete produced results in 631 pounds of carbon dioxide being released into the atmosphere. Eight percent of the carbon dioxide released into the earth's atmosphere annually is a result of concrete production.

There's no doubt that concrete is very useful material. But there are less energy intensive alternatives. For instance, plain old earth. Earthen floors are common in less industrialized countries and from what I can gather can be just as tough as a concrete floor. An earthen floor is made up of clay, sand and some kind of binder, often straw. This is mixed into a paste not unlike concrete, poured like concrete, and let to dry. An oil is used to seal it. Earthen floors have been successfully employed in retail spaces with heavy traffic.

Green Roof

We've also been thinking about a green roof. The design meeting in New York a few weeks ago really liked the idea.

What is a green roof? It's essentially a roof with several inches of light weight growing medium in which hardy plants live providing protection to the roof and insulation from temperature swings. The roof structure has to be stronger to support the additional weight, but not so much that it would increase the cost of the structure significantly. A green roof captures a lot of the moisture that falls on it, reducing the runoff from the roof which help keep the walls of the building dry. This is really important in straw bale construction. Some cities, mostly in Germany and Japan, are incenting green roof construction because it so dramatically reduces runoff which has become a serious issue. A green roof would also look pretty interesting. Some people use goats to keep it tidy.

Staw Bale

Straw bale is a construction option we've been considering. It attractive for lots of reasons: material is inexpensive, about a dollar a bale; it's low tech, nearly anyone can help build with it; it's non-toxic, unlike so much of the construction materials used today; and it provides excellent thermal and sound insulation, much more so than traditional construction. It's downside is that it is labor intensive, it can rot if not installed properly, and in Vermont it cannot support roof loads so a separate structure has to be built to support the roof (in sunnier, drier places the bales can support the roof eliminating the need for wall structure).

I feel like it's a good option for Destiny primarily because it takes little skill to put up which means more people can participate meaningfully in the construction. It also appeals to my sense of adventure and I would really love to learn how to put a straw bale building together. It's also radical, bucking the use of mainstream materials in favor of simpler and very sustainable technology.

I have faith that it would work. A book published by Chelsea Green called Serious Straw Bale describes projects mostly in Quebec, a climate much like ours, actually harsher. Fire is a big concern of many, but straw bale being completely encased in mud, lime or concrete, has high fire resistance, and it can be coated with boric acid before mudding to further retard combustibility.

Budget

There isn't much budget for this project. The total building budget is $40,000 for the bathhouse and the kitchen. It's apportioned $25,000 for the kitchen and $15,000 for the bathhouse. I'm hoping that we can save money by re-using the existing kitchen as the central structure for the bathhouse, perhaps bringing costs there down to about half the budgeted amount so we can use the saved money on the kitchen, bringing the budget for it up to about $$33,000.

Even so, this is an incredibly tight budget that will require using as much inexpensive material as possible. Using the wood from our land may help. Using recycled materials, things we scrounge at dumps, things that Keisha and I have stored over the years, and perhaps using straw bales for the walls may also help. Typical new construction today ranges from around $80/sf to over $200/sf. If we build a 1300 sf kitchen for $33,000 that's about $25/sf. I think this is doable. We just have to be very careful and not too picky about what we can get.

Inside

Here's a look at the interior planning so far. Basically, the building has three areas.

First, an open area that can be used for dining, circling or anything else. It would have tables, chairs, perhaps some built in benches along windows, some storage and probably a woodstove or fireplace.

Second, the kitchen area, more or less in the middle of the building, to prepare food for gatherings. The kitchen will have a six burner stove, an oven or two, a three-bay sink for dishwashing, and lots of counter and storage space.

Third, at the other end will be a bathroom, shower and mechanical room, and probably some more storage for the kitchen. The mechanical room will house a water storage and pressurization system, the solar power works and the water heating system.

Friday, April 08, 2005

Accidents & Unions

One of the things I really love about computers is their ability to generate delightful accidents quickly. As I've played with some of these models I've left two of the models "turned on" on occasion which generated a whole new building. The unions have a complexity that intrigues me, and some of them actually worked better in many respects they did singly. Gabriel pointed out that there's a nice metaphor here for gatherings where faeries of all stripes comingle producing a new entity during the gathering.

So, here's a basic pitched roof building...
...and here's a glass house.

Now glue them together and, viola, a nice screen porch wrapping the traditional building. Sure there are some wacky things that happen, but those can be worked with. The essential idea of intersection a rectangular screen porch with a slightly bent pitched roof building seems very pleasing to me and provides an essential need for the design: making a space for people to hang out when it's buggy.

Another view.

Michael Singer

I came across architect Michael Singer's website when looking for another architect whose work I like. I really like the simplicity of his work and the materials he uses: wood, stone, steel. Take a look. See what you think.

Thursday, April 07, 2005

Massings

Here are some preliminary massing experiments all looking from the same vantage point in what is now the meadow. These were generated with same 3d model shown in the prior post. This model lets me move anywhere on the site and take a look at things. I think it's going to be very useful.

TRADITIONAL This one is a traditional pitched roof, about 45 degree angle, which would be metal most likely. The building is kinked slightly to embrace the space on the south side of the building (what we're looking at). This would be very easy to build since almost every building in New England looks like this. One nice feature of this kind of design is the large roof area that's visible, which is missing in some of the designs below. You can check out how not seeing the roof changes the feeling of a building.

GLASS Here's kind of a joke, but interesting. This is a glass house design with a flat roof. Contrast this with the prior model. A very different feeling. I don't think this would be practical but it's kind of the other end of the extreme from a standard pitched roof with solid walls.

CRUSH This was the first massing experiment I did. I was thinking about a green roof and what kind of surface would be appropriate for that. I thought that perhaps a multi-pitched roof would look kind of cool mimicking the terrain. I still think it would look pretty cool, but my feeling is all the angularity actually disguises the building. Even in this simplified model the complexity makes the building a lot less clear. It would be a lot harder to build too.

SLANT Here's the same shape building as the pitched roof but with a big slanty roof. I like the way this design counterpoints the downward slope of the land with a rising roof. I think I'll play with this one a bit more, trying to angle the roof so that it's more visible from the circle.

CUBES Some cubes to mimic the bathhouse, which is also a cube of sorts with a pyramid roof. The idea here was to have the kitchen and dining areas each in a separate space. It looks a little too much like a commercial mall building for my taste, but I think that could be dealt with. My feeling is that the kitchen and dining space should be one however, so that the cooks don't cut off from social activities. More on this later.

Comments welcome.

Birdseye

Here's an aerial shot of Destiny that I constructed showing the bathhouse, kitchen and gathering circles amongst a nice grove of artificial looking trees. I built this model to help me look at and experience the site with different shaped buildings. I will post images of specific buildings with comments as I develop them.

I'm jumping the gun a bit with this post, but I will get to details in a bit. The bathhouse uses the existing kitchen structure built by John Tidd as the central dressing area. The kitchen in this image is a vanilla pitched roof structure, but it doesn't look too bad.

Now that I have this 3D model I try out all kinds of different models out on it, checking out the sun, time of year, views. The only problem is that the leaves don't fall off the trees in winter.

Primitive Hut

This image planted the seed for design of the kitchen and bathhouse. It got me thinking about how to use the trees that we will cut on the land to create intimate and natural feeling buildings connected to the land. I really love the feel of this little sitting pavilion and I think this kind of aesthetic could be used all over Destiny.

Design Program

Way back in 1998, Bambi and I got together at the mill in White River Junction and put together this document which contains as many of the concerns and issues people had raised over the life of Faerie Camp Destiny about development.

Clearing

After deciding to relocate the buildings and clear the land I spent a good deal of time up on the land looking at views and thinking about elevations, accessibility, grading and sightlines. After the leaves fell it became clear that if we cleared as much as we had agreed we would be able to see the neighbors farm very clearly and they would be able to see us. This in conjunction with concerns about sound led to a retreat from the clearcutting idea back to a "parkland" idea where many trees would be preserved to provide both visual and aural insulation from the valley and neighbors.

Five new proposals were drawn up over a month or so and presented in New York at the More Than Annual Meeting.

1. Approved

• State approved plan
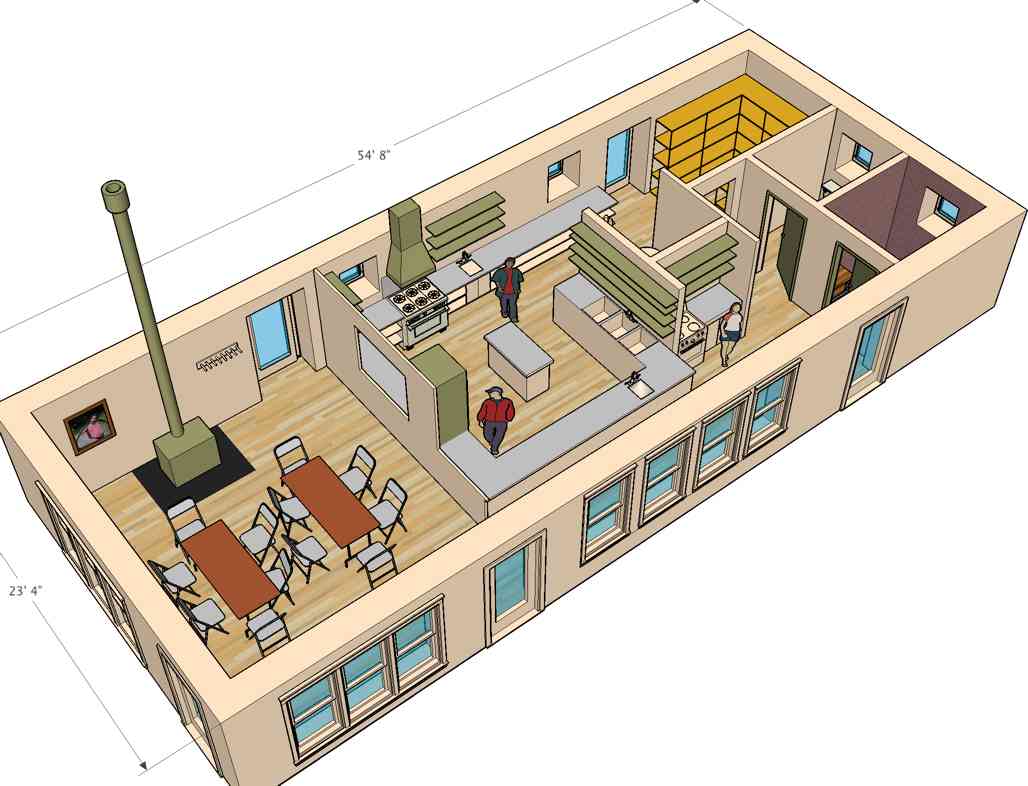
• 24’ x 24’ Kitchen
• 20’ x 20’ Bath House
• Meadow undeveloped
• Additional clearing for gardens
• New road/path to bath house
• No clearing below road except for mound and trench

2 Elbow

• Kitchen & Dining Pavilion separate with deck joining them
• Bath House uphill near end of exposed ledge
• Gardens between Bath House and Circle
• Flat circle with amphitheater formed in meadow
• Separate fire circle
• Parkland below road

3 Embrace

• Kitchen & Dining pavilion embrace a deck space
• Bath house located directly uphill on radius around central circle
• Parkland below road
• Gardens between lodge complex and bathhouse

4 Termimator

• Kitchen and dining pavilion terminate road in a single building
• Bath House adjacent and level with Kitchen
• Winding path down hill through parkland
• Gardens extend uphill from road
• Sitting circle in meadow

5 Gateway

• Kitchen and Dining Pavilion split across road
• Bathhouse uphill near exposed ledge facing onto circle
• Circle contains fire pit
• Complete clearing below road for views
• Oak tree preserved as central element in clearing.

The New York meeting didn't really consent to a particular plan, but encouraged the development of ideas in 2 and 3. The kitchen in 3 was liked for its embrace and the location of the bathhouse in 2 was liked.

After the New York meeting I took a break from design, which didn't pick up again until February 2005.

The Site

Destiny is made up of two parcels of land in Chester and Grafton, Vermont, totaling 165 acres. Destiny applied for and received state approval to develop a "campground" that includes a kitchen, dining facility, several out building, a bathing facility and tent sites for campers. The state granted approval to develop about five acres of land on the western side of the upper parcel. Destiny also applied for and received approval for a water supply and wastewater system.

The Design Comet, a small committee, formed last summer to move the design process forward with the hopes of starting construction this coming summer, 2005. The first things the comet did was to take a look at what had been done. Many things had been decided, including well location, kitchen and bathhouse locations and the construction of a road to the well site. After collecting a lot of information about our water system, sun patterns, sound and neighbors, the Design Comet decided to reconsider the site plan and hold off on any further construction until this spring.

To begin with, we (the comet) began looking at the overall site, the allowed development area, and the clearing that had been done to date, with an eye toward siting the building to take advantage of sun, slope and any aesthetic features on the land.

This sun study shows how sun plays on the land throughout the year. This study showed that because of tree heights that any buildings placed along the western side of the meadow or any cleared land would be in shadow a good part of the day, even in mid-summer. This suggested moving the buildings to the eastern side of the land where they could receive full sun most of the day. Three schemes were developed start the design process.

The first shows the site as it is, with nothing done to it. A meadow has been cleared and a road cut in. There are no buildings on the site. This do nothing option was really not an option since our permit to be on the land requires us to make certain improvements, such as the water system.

The second shows two acres cleared and the buildings as permitted. The two buildings (brown squares) shown are the permitted kitchen and bathhouse. The kitchen was permitted to be 576 square feet and the bathhouse 400 square feet.

The third plan shows five acres cleared and the buildings relocated to above the road and to the east of the meadow. This arrangement came about as a result of discussions on the land, looking at sight lines, sun, accessibility and construction issues and was ultimately chosen as the route to pursue for further development.

Welcome

I'm starting this blog (me being Matt) to help finish up the design process for Faerie Camp Destiny. So far we've had meetings in Boston, New York and some informal meetings up here in Vermont where I am.

I'm hoping this blog will serve to fill in the gaps between meetings, allow people who haven't been to the meetings to peek and comment on the design process. I will post drawings with commentary and anyone can put in their two cents using the comment mechanism. I will check the blog regularly for comments, and respond if it seems appropriate. After it's all done we'll have a nice record of the process.